0%

[toc]

概述

目前比较主流的分布式锁有两种选择:一种是使用redis集群做分布式锁,另外一种是使用zookeeper,这两种分布式锁有着各自的特点,但是在技术选型上,我还是推荐使用zookeeper来做分布式锁,至于为什么不推荐redis集群来做分布式锁,我会在下面阐述。

CAP理论

1.Consistency 一致性

一致性指“all nodes see the same data at the same time”,即更新操作成功并返回客户端完成后,所有节点在同一时间的数据完全一致,所以,一致性,说的就是数据一致性。分布式的一致性

对于一致性,可以分为从客户端和服务端两个不同的视角。从客户端来看,一致性主要指的是多并发访问时更新过的数据如何获取的问题。从服务端来看,则是更新如何复制分布到整个系统,以保证数据最终一致。

一致性是因为有并发读写才有的问题,因此在理解一致性的问题时,一定要注意结合考虑并发读写的场景。

从客户端角度,多进程并发访问时,更新过的数据在不同进程如何获取的不同策略,决定了不同的一致性。

三种一致性策略

  • 对于关系型数据库,要求更新过的数据能被后续的访问都能看到,这是强一致性。
  • 如果能容忍后续的部分或者全部访问不到,则是弱一致性。
  • 如果经过一段时间后要求能访问到更新后的数据,则是最终一致性。

CAP中说,不可能同时满足的这个一致性指的是强一致性。

2.Availability 可用性

可用性指“Reads and writes always succeed”,即服务一直可用,而且是正常响应时间。

对于一个可用性的分布式系统,每一个非故障的节点必须对每一个请求作出响应。所以,一般我们在衡量一个系统的可用性的时候,都是通过停机时间来计算的。

3.Partition Tolerance分区容错性

分区容错性指“the system continues to operate despite arbitrary message loss or failure of part of the system”,即分布式系统在遇到某节点或网络分区故障的时候,仍然能够对外提供满足一致性和可用性的服务。

分区容错性和扩展性紧密相关。在分布式应用中,可能因为一些分布式的原因导致系统无法正常运转。好的分区容错性要求能够使应用虽然是一个分布式系统,而看上去却好像是在一个可以运转正常的整体。比如现在的分布式系统中有某一个或者几个机器宕掉了,其他剩下的机器还能够正常运转满足系统需求,或者是机器之间有网络异常,将分布式系统分隔未独立的几个部分,各个部分还能维持分布式系统的运作,这样就具有好的分区容错性。

为什么不建议使用redis分布锁

主从切换可能丢失锁信息

考虑一下这样的场景:在分布式环境中,很多并发需要锁来同步,当使用redis分布式锁,通用的做法是使用redis的setnx key value px 这样的命令,设置一个字段,当设置成功说明获取锁,设置不成功说明锁被占用,当获取所之后需要删除锁,也就是删除设置的锁字段,这是锁可以被其他占用。

这里在主从切换回出现问题,当第一个线程在主服务器上设置了锁,但是这时候从服务器并没有及时同步主服务器的状态,也就是没有同步主服务器中的锁字段,而此时,主服务器挂了,redis的哨兵模式升级从服务器为主服务器,如果在并发量大的情况下,虽然第一个线程获取了锁,其他线程会在当前的主服务器(之前的从服务器,但是并没有同步已经设置的锁字段)上设置锁字段,这样并不能保证锁的互斥性。

缓存易失性

假如第一个线程设置了锁,但是之后触发内存淘汰机制很不幸淘汰了设置的锁字段,接下来的线程在第一个线程没有释放锁的情况下,也是重新设置锁字段的,这样并不能保证锁的安全性。

其他

但是如果不在意上诉问题,其实可以用 redis 做分布式锁,毕竟简单。

redis 分布式锁的挑战

执行时间超过锁的过期时间

  • 客户 1 获取锁成功并设置 30 秒超时;
  • 客户 1 因为一些原因导致执行很慢(网络问题、发生 FullGC……),过了 30 秒依然没执行完,但是锁过期「自动释放了」;
  • 客户 2 申请加锁成功;
  • 客户 1 执行完成,执行 DEL 释放锁指令,这个时候就把 客户 2 的锁给释放了。

锁续期

我们可以让获得锁的线程开启一个守护线程,用来给快要过期的锁「续航」。加锁的时候设置一个过期时间,同时客户端开启一个「守护线程」,定时去检测这个锁的失效时间。如果快要过期,但是业务逻辑还没执行完成,自动对这个锁进行续期,重新设置过期时间。

避免释放别人的锁

在释放锁的时候,客户端将自己的「唯一标识」与锁上的「标识」比较是否相等,匹配上则删除,否则没有权利释放锁。通过 SET lock_resource_name $unique_id NX PX $expire_time,同时启动守护线程为快要过期单还没执行完毕的客户端的锁续命。由于是多个指令所以需要 lua 脚本来保证原子性。

解决 redis 主从切换的问题

如果客户端 1 刚往 master 节点写入一个分布式锁,此时这个指令还没来得及同步到 slave 节点。此时,master 节点宕机,其中一个 slave 被选举为新 master,这时候新 master 是没有客户端 1 写入的锁,锁丢失了。此刻,客户端 2 线程来获取锁,就成功了。

虽然这个概率极低,但是我们必须得承认这个风险的存在。Redis 的作者为了统一分布式锁的标准,搞了一个 Redlock,算是 Redis 官方对于实现分布式锁的指导规范,https://redis.io/topics/distlock,但是这个 Redlock 也被国外的一些分布式专家给喷了。

太麻烦不看了

参考文档

https://blog.csdn.net/MOVIE14/article/details/82053391

https://www.51cto.com/article/689646.html

[TOC]

什么是 context

本质上 Go 语言是基于 context 来实现和搭建了各类 goroutine 控制的,并且与 select-case 联合,就可以实现进行上下文的截止时间、信号控制、信息传递等跨 goroutine 的操作,是 Go 语言协程的重中之重。

**在 Goroutine 构成的树形结构中对信号进行同步以减少计算资源的浪费是 context.Context 的最大作用。 context 的树形结构 对应着的就是 Goroutine 的树形结构 **

context 通过构建链表式的结构来实现多层级的 cancel 传递,而 timeout 的逻辑也是通过传递一个 “context deadline exceeded” 的 cancel 错误来实现所有的 信号的统一。

context 本质

我们在基本特性中介绍了不少 context 的方法,其基本大同小异。看上去似乎不难,接下来我们看看其底层的基本原理和设计。

context 相关函数的标准返回如下:

1
func WithXXXX(parent Context, xxx xxx) (Context, CancelFunc)

其返回值分别是 ContextCancelFunc,接下来我们将进行分析这两者的作用。

接口

Context 接口:

1
2
3
4
5
6
type Context interface {
Deadline() (deadline time.Time, ok bool)
Done() <-chan struct{}
Err() error
Value(key interface{}) interface{}
}
  • Deadline:获取当前 context 的截止时间。
  • Done:获取一个只读的 channel,类型为结构体。可用于识别当前 channel 是否已经被关闭,其原因可能是到期,也可能是被取消了。
  • Err:获取当前 context 被关闭的原因
  • Value:获取当前 context 对应所存储的上下文信息。

Canceler 接口:

1
2
3
4
type canceler interface {
cancel(removeFromParent bool, err error)
Done() <-chan struct{}
}
  • cancel:调用当前 context 的取消方法。
  • Done:与前面一致,可用于识别当前 channel 是否已经被关闭。

基础结构

yiFBNR.png

在标准库 context 的设计上,一共提供了四类 context 类型来实现上述接口。分别是 emptyCtxcancelCtxtimerCtx 以及 valueCtx

emptyCtx

在日常使用中,常常使用到的 context.Background 方法,又或是 context.TODO 方法。

源码如下:

1
2
3
4
5
6
7
8
9
10
11
12
var (
background = new(emptyCtx)
todo = new(emptyCtx)
)

func Background() Context {
return background
}

func TODO() Context {
return todo
}

其本质上都是基于 emptyCtx 类型的基本封装。而 emptyCtx 类型本质上是实现了 Context 接口:

实际上 emptyCtx 类型的 context 的实现非常简单,因为他是空 context 的定义,因此没有 deadline,更没有 timeout,可以认为就是一个基础空白 context 模板。

cancelCtx

在调用 context.WithCancel 方法时,我们会涉及到 cancelCtx 类型,其主要特性是取消事件。源码如下:

1
2
3
4
5
6
7
8
9
func WithCancel(parent Context) (ctx Context, cancel CancelFunc) {
c := newCancelCtx(parent)
propagateCancel(parent, &c)
return &c, func() { c.cancel(true, Canceled) }
}

func newCancelCtx(parent Context) cancelCtx {
return cancelCtx{Context: parent}
}

其中的 newCancelCtx 方法将会生成出一个可以取消的新 context,如果该 context 执行取消,与其相关联的子 context 以及对应的 goroutine 也会收到取消信息。

例子

首先 main goroutine 创建并传递了一个新的 context 给 goroutine b,此时 goroutine b 的 context 是 main goroutine context 的子集:

yik0sS.png

传递过程中,goroutine b 再将其 context 一个个传递给了 goroutine c、d、e。最后在运行时 goroutine b 调用了 cancel 方法。使得该 context 以及其对应的子集均接受到取消信号,对应的 goroutine 也进行了响应。

demo

1
2
3
4
5
6
7
8
9
10
11
12
13
14
15
16
17
18
19
20
func stopWithContext() {
ctx := context.Background()
ctx, cancel := context.WithCancel(ctx)
go func(ctx context.Context) {
for {
select {
case data := <-ctx.Done():
fmt.Println("监控退出,停止了...", data, ctx.Err())
return
default:
fmt.Println("goroutine监控中...")
time.Sleep(200 * time.Millisecond)
}
}
}(ctx)

time.Sleep(1 * time.Second)
cancel()
time.Sleep(1 * time.Second)
}

源代码

1
2
3
4
5
6
7
8
9
10
11
12
13
14
15
16
17
18
19
20
21
22
23
24
25
26
27
28
29
30
31
32
33
34
35
36
37
38
39
40
41
42
43
44
45
46
47
48
49
50
51
52
53
54
55
56
57
58
59
60
61
62
63
64
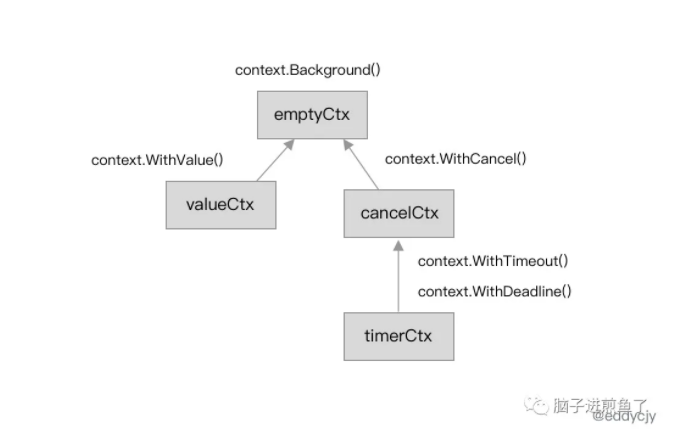
// A cancelCtx can be canceled. When canceled, it also cancels any children
// that implement canceler.
type cancelCtx struct {
Context

mu sync.Mutex // protects following fields
done chan struct{} // created lazily, closed by first cancel call
children map[canceler]struct{} // set to nil by the first cancel call
err error // set to non-nil by the first cancel call
}

func (c *cancelCtx) Value(key interface{}) interface{} {
if key == &cancelCtxKey {
return c
}
return c.Context.Value(key)
}

func (c *cancelCtx) Done() <-chan struct{} {
c.mu.Lock()
if c.done == nil {
c.done = make(chan struct{})
}
d := c.done
c.mu.Unlock()
return d
}

func (c *cancelCtx) Err() error {
c.mu.Lock()
err := c.err
c.mu.Unlock()
return err
}

// cancel 函数, 可以看到,对所有的子 context 也调用的 cancel
// cancel closes c.done, cancels each of c's children, and, if
// removeFromParent is true, removes c from its parent's children.
func (c *cancelCtx) cancel(removeFromParent bool, err error) {
if err == nil {
panic("context: internal error: missing cancel error")
}
c.mu.Lock()
if c.err != nil {
c.mu.Unlock()
return // already canceled
}
c.err = err
if c.done == nil {
c.done = closedchan
} else {
close(c.done)
}
for child := range c.children {
// NOTE: acquiring the child's lock while holding parent's lock.
child.cancel(false, err)
}
c.children = nil
c.mu.Unlock()

if removeFromParent {
removeChild(c.Context, c)
}
}

timerCtx

在调用 context.WithTimeout 方法时,我们会涉及到 timerCtx 类型,其主要特性是 Timeout 和 Deadline 事件,源码如下:

1
2
3
4
5
6
7
8
9
10
11
func WithTimeout(parent Context, timeout time.Duration) (Context, CancelFunc) {
return WithDeadline(parent, time.Now().Add(timeout))
}

func WithDeadline(parent Context, d time.Time) (Context, CancelFunc) {
...
c := &timerCtx{
cancelCtx: newCancelCtx(parent),
deadline: d,
}
}

你可以发现 timerCtx 类型是基于 cancelCtx 类型的。我们再进一步看看 timerCtx 结构体:

1
2
3
4
5
6
7
8
9
// A timerCtx carries a timer and a deadline. It embeds a cancelCtx to
// implement Done and Err. It implements cancel by stopping its timer then
// delegating to cancelCtx.cancel.
type timerCtx struct {
cancelCtx
timer *time.Timer // Under cancelCtx.mu.

deadline time.Time
}

源代码

cancel
1
2
3
4
5
6
7
8
9
10
11
12
13
14
15
16
func (c *timerCtx) Deadline() (deadline time.Time, ok bool) {
return c.deadline, true
}

func (c *timerCtx) cancel(removeFromParent bool, err error) {
c.cancelCtx.cancel(false, err)
if removeFromParent {
removeChild(c.cancelCtx.Context, c)
}
c.mu.Lock()
if c.timer != nil {
c.timer.Stop()
c.timer = nil
}
c.mu.Unlock()
}

cancel 先会调用 cancelCtx 类型的取消事件。若存在父级节点,则移除当前 context 子节点,最后停止定时器并进行定时器重置。而 Deadline 或 Timeout 的行为则由 timerCtxWithDeadline 方法实现:

timeout
1
2
3
4
5
6
7
8
9
10
11
12
13
14
15
16
17
18
19
20
21
22
func WithDeadline(parent Context, d time.Time) (Context, CancelFunc) {
// 进行前置判断,若父级节点的 Deadline 时间早于当前所指定的 Deadline 时间,将会直接生成一个 cancelCtx 的 context。
if cur, ok := parent.Deadline(); ok && cur.Before(d) {
// The current deadline is already sooner than the new one.
return WithCancel(parent)
}
// ...
dur := time.Until(d)
if dur <= 0 {
c.cancel(true, DeadlineExceeded) // deadline has already passed
return c, func() { c.cancel(false, Canceled) }
}
c.mu.Lock()
defer c.mu.Unlock()
if c.err == nil {
// 开启了一个 timer
c.timer = time.AfterFunc(dur, func() {
c.cancel(true, DeadlineExceeded)
})
}
return c, func() { c.cancel(true, Canceled) }
}

valueCtx

在调用 context.WithValue 方法时,我们会涉及到 valueCtx 类型,其主要特性是涉及上下文信息传递,源码如下:

1
2
3
4
5
6
7
8
9
10
11
12
13
14
15
func WithValue(parent Context, key, val interface{}) Context {
...
if !reflectlite.TypeOf(key).Comparable() {
panic("key is not comparable")
}
return &valueCtx{parent, key, val}
}

// 本质上 `valueCtx` 类型是一个单向链表,会在调用 `Value` 方法时先查询自己的节点是否有该值。若无,则会通过自身存储的上层父级节点的信息一层层向上寻找对应的值,直到找到为止。!!!
func (c *valueCtx) Value(key interface{}) interface{} {
if c.key == key {
return c.val
}
return c.Context.Value(key)
}

context 取消事件

在我们针对 context 的各类延伸类型和源码进行了分析后。我们进一步提出一个疑问点,context 是如何实现跨 goroutine 的取消事件并传播开来的,是如何实现的

这个问题的答案就在于 WithCancelWithDeadline 都会涉及到 propagateCancel 方法,其作用是构建父子级的上下文的关联关系,若出现取消事件时,就会进行处理:

1
2
3
4
5
6
7
8
9
10
11
12
13
14
15
16
17
18
19
20
21
22
23
24
25
26
27
28
29
30
31
32
33
34
35
36
37
38
39
40
41
42
43
44
// propagateCancel arranges for child to be canceled when parent is.
func propagateCancel(parent Context, child canceler) {
// 当父级上下文(parent)的 Done 结果为 nil 时,将会直接返回,因为其不会具备取消事件的基本条件,可能该 context 是 Background、TODO 等方法产生的空白 context。
done := parent.Done()
if done == nil {
return // parent is never canceled
}

// 当父级上下文(parent)的 Done 结果不为 nil 时,则发现父级上下文已经被取消,作为其子级,该 context 将会触发取消事件并返回父级上下文的取消原因。双检查机制
select {
case <-done:
// parent is already canceled
child.cancel(false, parent.Err())
return
default:
}

// 经过前面一个代码片段的判断,已得知父级 context 未触发取消事件,当前父级和子级 context 均正常(未取消)。

if p, ok := parentCancelCtx(parent); ok {
p.mu.Lock()
if p.err != nil {
// parent has already been canceled
child.cancel(false, p.err)
} else {
if p.children == nil {
p.children = make(map[canceler]struct{})
}
// 调用 parentCancelCtx 方法找到具备取消功能的父级 context。并将当前 context,也就是 child 加入到 父级 context 的 children 列表中,等待后续父级 context 的取消事件通知和响应。(这样就能像链表一样实现整个 ctx 链路的传输了)
p.children[child] = struct{}{}
}
p.mu.Unlock()
} else {
// 调用 parentCancelCtx 方法没有找到,将会启动一个新的 goroutine 去监听父子 context 的取消事件通知。
atomic.AddInt32(&goroutines, +1)
go func() {
select {
case <-parent.Done():
child.cancel(false, parent.Err())
case <-child.Done():
}
}()
}
}

通过对 context 的取消事件和整体源码分析,可得知 cancelCtx 类型的上下文包含了其下属的所有子节点信息。也就是其在 children 属性的 map[canceler]struct{} 存储结构上就已经支持了子级关系的查找,也就自然可以进行取消事件传播了。

而具体的取消事件的实际行为,则是在前面提到的 propagateCancel方法中,会在执行例如cacenl` 方法时,会对父子级上下文分别进行状态判断,若满足则进行取消事件,并传播给子级同步取消。

使用

我们可以通过一个代码片段了解 context.Context 是如何对信号进行同步的。在这段代码中,我们创建了一个过期时间为 1s 的上下文,并向上下文传入 handle 函数,该方法会使用 500ms 的时间处理传入的请求:

  • 因为过期时间大于处理时间,所以我们有足够的时间处理该请求
  • 如果我们将处理请求时间增加至 1500ms,整个程序都会因为上下文的过期而被中止,:
1
2
3
4
5
6
7
8
9
10
11
12
13
14
15
16
17
18
19
func main() {
ctx, cancel := context.WithTimeout(context.Background(), 1*time.Second)
defer cancel()

go handle(ctx, 500*time.Millisecond)
select {
case <-ctx.Done():
fmt.Println("main", ctx.Err())
}
}

func handle(ctx context.Context, duration time.Duration) {
select {
case <-ctx.Done():
fmt.Println("handle", ctx.Err())
case <-time.After(duration):
fmt.Println("process request with", duration)
}
}

总结

作为 Go 语言的核心功能之一,其实标准库 context 非常的短小精悍,使用的都是基本的数据结构和理念。既满足了跨 goroutine 的调控控制,像是并发、超时控制等。

同时也满足了上下文的信息传递。在工程应用中,例如像是链路ID、公共参数、鉴权校验等,都会使用到 context 作为媒介。

目前官方对于 context 的建议是作为方法的首参数传入,虽有些麻烦,但也有人选择将其作为结构体中的一个属性传入。但这也会带来一些心智负担,需要识别是否重新 new 一个。

也有人提出希望 Go2 取消掉 context,换成另外一种方法,但总体而言目前未见到正式的提案,这是我们都需要再思考的。

参考

一文吃透 Go 语言解密之上下文 context

上下文 Context

[TOC]

概述

前面我们介绍了boltdb底层在磁盘上数据时如何组织存储(page)的,然后又介绍了磁盘中的数据在内存中又是如何存储(node)的。接着我们又介绍了管理kv数据集合的Bucket对象以及用来遍历Bucket的Cursor对象。最后我们详细的介绍了boltdb中事务是如何实现(Tx)的。到此boltdb中 各个零散的部件我们都一一熟悉了,接下来是时候将他们组织在一起工作了。因而就有了boltdb中最上层的DB对象。本章主要介绍DB对象相关的方法以及其内部实现。

DB结构

1
2
3
4
5
6
7
8
9
10
11
12
13
14
15
16
// DB represents a collection of buckets persisted to a file on disk.
// All data access is performed through transactions which can be obtained through the DB.
// All the functions on DB will return a ErrDatabaseNotOpen if accessed before Open() is called.
type DB struct {
path string
file *os.File // 真实存储数据的磁盘文件
lockfile *os.File // windows only
dataref []byte // mmap'ed readonly, write throws SEGV
// 通过mmap映射进来的地址
data *[maxMapSize]byte
datasz int
filesz int // current on disk file size
// 元数据
meta0 *meta
meta1 *meta
}

对外接口

1
2
// 创建数据库接口
func Open(path string, mode os.FileMode, options *Options) (*DB, error)

db.View()实现分析

View()主要用来执行只读事务。事务的开启、提交、回滚都交由tx控制。

db.Update()实现分析

Update()主要用来执行读写事务。事务的开始、提交、回滚都交由tx内部控制

db.Batch()实现分析

现在对Batch()方法稍作分析,在DB定义的那一节中我们可以看到,一个DB对象拥有一个batch对象,该对象是全局的。当我们使用Batch()方法时,内部会对将传递进去的fn缓存在calls中。

其内部也是调用了Update,只不过是在Update内部遍历之前缓存的calls。

有两种情况会触发调用Update。

  1. 第一种情况是到达了MaxBatchDelay时间,就会触发Update
  2. 第二种情况是len(db.batch.calls) >= db.MaxBatchSize,即缓存的calls个数大于等于MaxBatchSize时,也会触发Update。

Batch的本质是: 将每次写、每次刷盘的操作转变成了多次写、一次刷盘,从而提升性能。

1
2
3
4
5
6
7
8
9
10
11
12
13
14
15
16
17
18
19
20
21
22
23
24
25
26
27
28
29
30
31
32
33
34
35
36
37
38
39
40
41
42
43
44
45
46
47
48
49
50
51
52
53
54
55
56
57
58
59
60
61
62
63
64
65
66
67
68
69
70
71
72
73
74
75
// 幂等
// The maximum batch size and delay can be adjusted with DB.MaxBatchSize
// and DB.MaxBatchDelay, respectively.
//
// Batch is only useful when there are multiple goroutines calling it.
func (db *DB) Batch(fn func(*Tx) error) error {
errCh := make(chan error, 1)
db.batchMu.Lock()
if (db.batch == nil) || (db.batch != nil && len(db.batch.calls) >= db.MaxBatchSize) {
// There is no existing batch, or the existing batch is full; start a new one.
db.batch = &batch{
db: db,
}
// 超时控制
db.batch.timer = time.AfterFunc(db.MaxBatchDelay, db.batch.trigger)
}
db.batch.calls = append(db.batch.calls, call{fn: fn, err: errCh})
// 数量控制
if len(db.batch.calls) >= db.MaxBatchSize {
// wake up batch, it's ready to run
go db.batch.trigger()
}
db.batchMu.Unlock()
err := <-errCh
if err == trySolo {
err = db.Update(fn)
}
return err
}

// run performs the transactions in the batch and communicates results
// back to DB.Batch.
func (b *batch) run() {
b.db.batchMu.Lock()
b.timer.Stop()
// Make sure no new work is added to this batch, but don't break
// other batches.
if b.db.batch == b {
b.db.batch = nil
}
b.db.batchMu.Unlock()

retry:
for len(b.calls) > 0 {
var failIdx = -1
err := b.db.Update(func(tx *Tx) error {
// 遍历函数函数调用
for i, c := range b.calls {
if err := safelyCall(c.fn, tx); err != nil {
failIdx = i
return err
}
}
return nil
})

if failIdx >= 0 {
// take the failing transaction out of the batch. it's
// safe to shorten b.calls here because db.batch no longer
// points to us, and we hold the mutex anyway.
c := b.calls[failIdx]
b.calls[failIdx], b.calls = b.calls[len(b.calls)-1], b.calls[:len(b.calls)-1]
// tell the submitter re-run it solo, continue with the rest of the batch
c.err <- trySolo
continue retry
}

// pass success, or bolt internal errors, to all callers
// 失败的单独重试一次
for _, c := range b.calls {
c.err <- err
}
break retry
}
}

db.allocate()和db.grow()分析

1
2
3
4
5
6
7
8
9
10
11
12
13
14
15
16
17
18
19
20
21
22
23
24
25
26
27
28
29
30
31
32
33
34
35
36
37
38
39
40
41
42
43
44
45
46
47
48
49
50
51
52
53
54
55
56
57
58
59
60
61
62
63
// allocate returns a contiguous block of memory starting at a given page.
func (db *DB) allocate(count int) (*page, error) {
// Allocate a temporary buffer for the page.
var buf []byte
if count == 1 {
buf = db.pagePool.Get().([]byte)
} else {
buf = make([]byte, count*db.pageSize)
}
// 转成*page
p := (*page)(unsafe.Pointer(&buf[0]))
p.overflow = uint32(count - 1)
// Use pages from the freelist if they are available.
// 先从空闲列表中找
if p.id = db.freelist.allocate(count); p.id != 0 {
return p, nil
}
// 找不到的话,就按照事务的pgid来分配
// 表示需要从文件内部扩大
// Resize mmap() if we're at the end.
p.id = db.rwtx.meta.pgid
// 因此需要判断是否目前所有的页数已经大于了mmap映射出来的空间
// 这儿计算的页面总数是从当前的id后还要计算count+1个
var minsz = int((p.id+pgid(count))+1) * db.pageSize
if minsz >= db.datasz {
if err := db.mmap(minsz); err != nil {
return nil, fmt.Errorf("mmap allocate error: %s", err)
}
}
// Move the page id high water mark.
// 如果不是从freelist中找到的空间的话,更新meta的id,也就意味着是从文件中新扩展的页
db.rwtx.meta.pgid += pgid(count)
return p, nil
}
// grow grows the size of the database to the given sz.
func (db *DB) grow(sz int) error {
// Ignore if the new size is less than available file size.
if sz <= db.filesz {
return nil
}
// 满足这个条件sz>filesz
// If the data is smaller than the alloc size then only allocate what's needed.
// Once it goes over the allocation size then allocate in chunks.
if db.datasz < db.AllocSize {
sz = db.datasz
} else {
sz += db.AllocSize
}
// Truncate and fsync to ensure file size metadata is flushed.
// https://github.com/boltdb/bolt/issues/284
if !db.NoGrowSync && !db.readOnly {
if runtime.GOOS != "windows" {
if err := db.file.Truncate(int64(sz)); err != nil {
return fmt.Errorf("file resize error: %s", err)
}
}
if err := db.file.Sync(); err != nil {
return fmt.Errorf("file sync error: %s", err)
}
}
db.filesz = sz
return nil
}

[TOC]

概述

本书是采用自底向上的方式来介绍boltdb内部的实现原理。其实我们经常都在采用自底向上或者自顶向下这两种方式来思考和求解问题。

例如:我们阅读源码时,通常都是从最顶层的接口点进去,然后层层深入内部。这其实本质上就是一种自顶向下的方式。

又比如我们平常做开发时,都是先将系统进行拆分、解耦。然后一般都会采用从下而上或者从上而下的方式来进行开发迭代。

回到最初的话题,为什么本书要采用自底向上的方式来写呢?

对于一个文件型数据库而言,所谓的上指的是暴露给用户侧的调用接口。所谓的下又指它的输出(数据)最终要落到磁盘这种 存储介质上。采用自底向上的方式的话,也就意味着我们先从磁盘这一层进行分析。然后逐步衍生到内存;再到用户接口这一层。层层之间是 被依赖的一种关系。这样的话,其实就比较好理解了。在本书中,本人采用自底向上的方式来介绍。希望阅读完后,有一种自己从0到1构建了 一块数据库的快感。

当然也可以采用自顶向下的方式来介绍,这时我们就需要在介绍最上层时,先假设它所依赖的底层都已经就绪了,我们只分析当层内容。然后层层 往下扩展。

之前和一位大佬进行过针对此问题的探讨,在不同的场景、不同的组件中。具体采用自底向上还是自顶向下来分析。见仁见智,也具体问题具体分析。当要达成的目标足够清晰时,通过自顶向下的方式可以倒推达成目标需要完成的几个阶段任务。然后再依次进行细分展开。

boltdb是什么

Bolt is a pure Go key/value store inspired by [Howard Chu’s][hyc_symas] [LMDB project][lmdb]. The goal of the project is to provide a simple, fast, and reliable database for projects that don’t require a full database server such as Postgres or MySQL.

Since Bolt is meant to be used as such a low-level piece of functionality, simplicity is key. The API will be small and only focus on getting values and setting values. That’s it.

boltdb的黑科技

1. mmap

在boltdb中所有的数据都是以page页为单位组织的,那这时候通常我们的理解是,当通过索引定位到具体存储数据在某一页时,然后就先在页缓存中找,如果页没有缓存,则打开数据库文件中开始读取那一页的数据就好了。 但这样的话性能会极低。boltdb中是通过mmap内存映射技术来解决这个问题。当数据库初始化时,就会进行内存映射,将文件中的数据映射到内存中的一段连续空间,后续再读取某一页的数据时,直接在内存中读取。性能大幅度提升。

2. b+树

在boltdb中,索引和数据时按照b+树来组织的。其中一个bucket对象对应一颗b+树,叶子节点存储具体的数据,非叶子节点只存储具体的索引信息,很类似mysql innodb中的主键索引结构。同时值得注意的是所有的bucket也构成了一颗树。但该树不是b+树。

3. 嵌套bucket

前面说到,在boltdb中,一个bucket对象是一颗b+树,它上面存储一批kv键值对。但同时它还有一个特性,一个bucket下面还可以有嵌套的subbucket。subbucket中还可以有subbucket。这个特性也很重要。

使用

1
2
3
4
5
6
7
8
9
10
11
12
13
14
15
16
17
18
19
20
21
22
23
24
25
26
27
28
29
30
31
32
33
34
35
36
37
38
39
40
41
42
43
44
45
46
47
48
func first() {
// 在当前目录下打开 my.db 这个文件
// 如果文件不存在,将会自动创建
db, err := bolt.Open("my.db", 0600, &bolt.Options{Timeout: 1 * time.Second})
if err != nil {
log.Fatal(err)
}
defer db.Close()

key := []byte("hello")
value := []byte("world")

// 创建一个 read-write 事务来进行写操作
err = db.Update(func(tx *bolt.Tx) error {
// 如果 bucket 不存在则,创建一个 bucket
bucket, err := tx.CreateBucketIfNotExists(testBucket)
if err != nil {
return err
}

// 将 key-value 写入到 bucket 中
err = bucket.Put(key, value)
if err != nil {
return err
}
return nil
})
if err != nil {
log.Fatal(err)
}

// 创建一个 read-only 事务来获取数据
err = db.View(func(tx *bolt.Tx) error {
// 获取对应的 bucket
bucket := tx.Bucket(testBucket)
// 如果 bucket 返回为 nil,则说明不存在对应 bucket
if bucket == nil {
return fmt.Errorf("bucket %q is not found", testBucket)
}
// 从 bucket 中获取对应的 key(即上面写入的 key-value)
val := bucket.Get(key)
fmt.Printf("%s: %s\n", string(key), string(val))
return nil
})
if err != nil {
log.Fatal(err)
}
}

参考

自底向上分析boltdb源码

boltdb 源码分析

[TOC]

Bucket数据结构

1
2
3
4
5
6
7
8
9
10
11
12
13
14
15
16
17
18
19
20
21
22
23
24
25
// Bucket represents a collection of key/value pairs inside the database.
type Bucket struct {
*bucket
tx *Tx // the associated transaction
buckets map[string]*Bucket // subbucket cache
page *page // inline page reference
rootNode *node // materialized node for the root page.
nodes map[pgid]*node // node cache

// Sets the threshold for filling nodes when they split. By default,
// the bucket will fill to 50% but it can be useful to increase this
// amount if you know that your write workloads are mostly append-only.
//
// This is non-persisted across transactions so it must be set in every Tx.
FillPercent float64
}

// bucket represents the on-file representation of a bucket.
// This is stored as the "value" of a bucket key. If the bucket is small enough,
// then its root page can be stored inline in the "value", after the bucket
// header. In the case of inline buckets, the "root" will be 0.
type bucket struct {
root pgid // page id of the bucket's root-level page
sequence uint64 // monotonically incrementing, used by NextSequence()
}

Bucket遍历之Cursor

本节我们先做一节内容的铺垫,暂时不讲如何创建、获取、删除一个Bucket。而是介绍一个boltdb中的新对象Cursor。

答案是:所有的上述操作都是建立在首先定位到一个Bucket所属的位置,然后才能对其进行操作。而定位一个Bucket的功能就是由Cursor来完成的。所以我们先这一节给大家介绍一下boltdb中的Cursor。

我们先看下官方文档对Cursor的描述

Cursor represents an iterator that can traverse over all key/value pairs in a bucket in sorted order.

用大白话讲,既然一个Bucket逻辑上是一颗b+树,那就意味着我们可以对其进行遍历。前面提到的set、get操作,无非是要在Bucket上先找到合适的位置,然后再进行操作。而“找”这个操作就是交由Cursor来完成的。简而言之对Bucket这颗b+树的遍历工作由Cursor来执行。一个Bucket对象关联一个Cursor。下面我们先看看Bucket和Cursor之间的关系。

1
2
3
4
5
6
7
8
9
10
11
12
13
14
15
16
17
18
19
20
21
22
23
24
25
26
27
28
29
30
31
32
33
34
35
36
// Cursor creates a cursor associated with the bucket.
// The cursor is only valid as long as the transaction is open.
// Do not use a cursor after the transaction is closed.
func (b *Bucket) Cursor() *Cursor {
// Update transaction statistics.
b.tx.stats.CursorCount++

// Allocate and return a cursor.
return &Cursor{
bucket: b,
stack: make([]elemRef, 0),
}
}

// elemRef represents a reference to an element on a given page/node.
type elemRef struct {
page *page
node *node
index int
}

// isLeaf returns whether the ref is pointing at a leaf page/node.
func (r *elemRef) isLeaf() bool {
if r.node != nil {
return r.node.isLeaf
}
return (r.page.flags & leafPageFlag) != 0
}

// count returns the number of inodes or page elements.
func (r *elemRef) count() int {
if r.node != nil {
return len(r.node.inodes)
}
return int(r.page.count)
}

Cursor结构

1
2
3
4
5
6
7
8
9
type Cursor struct {
bucket *Bucket
stack []elemRef
}

// Bucket returns the bucket that this cursor was created from.
func (c *Cursor) Bucket() *Bucket {
return c.bucket
}

Cursor对外接口

下面我们看一下Cursor对外暴露的接口有哪些。看之前也可以心里先想一下。针对一棵树我们需要哪些遍历接口呢?

主体也就是三类:定位到某一个元素的位置、在当前位置从前往后找、在当前位置从后往前找

1
2
3
4
5
6
7
8
9
10
11
12
13
14
func (c *Cursor) First() (key []byte, value []byte)

func (c *Cursor) Last() (key []byte, value []byte)

func (c *Cursor) Next() (key []byte, value []byte)

func (c *Cursor) Prev() (key []byte, value []byte)

func (c *Cursor) Delete() error
// Seek moves the cursor to a given key and returns it.
// If the key does not exist then the next key is used. If no keys
// follow, a nil key is returned.
// The returned key and value are only valid for the life of the transaction.
func (c *Cursor) Seek(seek []byte) (key []byte, value []byte)

page node

1
2
3
4
5
6
7
8
9
10
11
12
13
14
15
16
17
18
19
20
21
22
23
24
25
26
27
28
29
30
31
32
// pageNode returns the in-memory node, if it exists.
// Otherwise returns the underlying page.
func (b *Bucket) pageNode(id pgid) (*page, *node) {
// Inline buckets have a fake page embedded in their value so treat them
// differently. We'll return the rootNode (if available) or the fake page.
if b.root == 0 {
if id != 0 {
panic(fmt.Sprintf("inline bucket non-zero page access(2): %d != 0", id))
}
if b.rootNode != nil {
return nil, b.rootNode
}
return b.page, nil
}

// Check the node cache for non-inline buckets.
if b.nodes != nil {
if n := b.nodes[id]; n != nil {
return nil, n
}
}

// Finally lookup the page from the transaction if no node is materialized.
return b.tx.page(id), nil
}

// data 表示 mmap 的 file 数据
// page retrieves a page reference from the mmap based on the current page size.
func (db *DB) page(id pgid) *page {
pos := id * pgid(db.pageSize)
return (*page)(unsafe.Pointer(&db.data[pos]))
}

Seek(key)实现分析

Seek()方法内部主要调用了seek()私有方法,我们重点关注seek()这个方法的实现,该方法有三个返回值,前两个为key、value、第三个为叶子节点的类型。前面提到在boltdb中,叶子节点元素有两种类型:一种是嵌套的子桶、一种是普通的key/value。而这二者就是通过flags来区分的。如果叶子节点元素为嵌套的子桶时,返回的flags为1,也就是bucketLeafFlag取值。

1
2
3
4
5
6
7
8
9
10
11
12
13
14
15
16
17
18
19
20
21
22
23
24
25
26
27
28
29
30
31
32
33
34
35
36
37
38
39
40
41
42
43
44
45
46
47
48
49
50
51
52
53
54
55
56
57
58
59
60
61
62
63
64
65
66
67
68
69
70
71
72
73
74
75
76
77
78
79
80
81
82
83
84
85
86
87
88
89
90
91
92
func (c *Cursor) Seek(seek []byte) (key []byte, value []byte) {
k, v, flags := c.seek(seek)
// If we ended up after the last element of a page then move to the next one.
// 下面这一段逻辑是必须的,因为在seek()方法中,如果ref.index>ref.count()的话,就直接返回nil,nil,0了
// 这里需要返回下一个
if ref := &c.stack[len(c.stack)-1]; ref.index >= ref.count() {
k, v, flags = c.next()
}
if k == nil {
return nil, nil
// 子桶的话
} else if (flags & uint32(bucketLeafFlag)) != 0 {
return k, nil
}
return k, v
}

// 实际上调用 search 方法
func (c *Cursor) seek(seek []byte) (key []byte, value []byte, flags uint32) {
// Start from root page/node and traverse to correct page.
c.stack = c.stack[:0]
c.search(seek, c.bucket.root)

// If this is a bucket then return a nil value.
return c.keyValue()
}

// 整个 search 就是构建了一个搜索栈,最后用 elemRef 中的 index, 这个 index 表示node 中 inodes 的下标,或者 page 下标。
// search recursively performs a binary search against a given page/node until it finds a given key.
func (c *Cursor) search(key []byte, pgid pgid) {
p, n := c.bucket.pageNode(pgid)
if p != nil && (p.flags&(branchPageFlag|leafPageFlag)) == 0 {
panic(fmt.Sprintf("invalid page type: %d: %x", p.id, p.flags))
}
e := elemRef{page: p, node: n}
// 搜索栈
c.stack = append(c.stack, e)

// If we're on a leaf page/node then find the specific node.
// 叶子结点就直接最后一次二分查询了
if e.isLeaf() {
c.nsearch(key)
return
}

// 搜索 node 或者 page, 差异非常小,因为本质上 node 就是 page 的 内存形式
if n != nil {
c.searchNode(key, n)
return
}
c.searchPage(key, p)
}

func (c *Cursor) searchNode(key []byte, n *node) {
var exact bool
index := sort.Search(len(n.inodes), func(i int) bool {
// TODO(benbjohnson): Optimize this range search. It's a bit hacky right now.
// sort.Search() finds the lowest index where f() != -1 but we need the highest index.
ret := bytes.Compare(n.inodes[i].key, key)
if ret == 0 {
exact = true
}
return ret != -1
})
if !exact && index > 0 {
index--
}
c.stack[len(c.stack)-1].index = index

// Recursively search to the next page.
c.search(key, n.inodes[index].pgid)
}

// keyValue returns the key and value of the current leaf element.
func (c *Cursor) keyValue() ([]byte, []byte, uint32) {
ref := &c.stack[len(c.stack)-1]

// If the cursor is pointing to the end of page/node then return nil.
if ref.count() == 0 || ref.index >= ref.count() {
return nil, nil, 0
}

// Retrieve value from node.
if ref.node != nil {
inode := &ref.node.inodes[ref.index]
return inode.key, inode.value, inode.flags
}

// Or retrieve value from page.
elem := ref.page.leafPageElement(uint16(ref.index))
return elem.key(), elem.value(), elem.flags
}

到这儿我们就已经看完所有的seek()查找一个key的过程了,其内部也很简单,就是从根节点开始,通过不断递归遍历每层节点,采用二分法来定位到具体的叶子节点。到达叶子节点时,其叶子节点内部存储的数据也是有序的,因此继续按照二分查找来找到最终的下标。

值得需要注意点:

在遍历时,我们都知道,有可能遍历到的当前分支节点数据并没有在内存中,此时就需要从page中加载数据遍历。所以在遍历过程中,优先在node中找,如果node为空的时候才会采用page来查找。

First()、Last()实现分析

1
2
3
4
5
6
7
8
9
10
11
12
13
14
15
16
17
18
19
20
21
22
23
24
25
26
27
28
29
30
31
32
33
34
35
36
37
38
39
40
41
42
func (c *Cursor) First() (key []byte, value []byte) {
_assert(c.bucket.tx.db != nil, "tx closed")
// 清空stack
c.stack = c.stack[:0]
p, n := c.bucket.pageNode(c.bucket.root)
// 一直找到第一个叶子节点,此处在天添加stack时,一直让index设置为0即可
ref := elemRef{page: p, node: n, index: 0}
c.stack = append(c.stack, ref)
c.first()
// If we land on an empty page then move to the next value.
// https://github.com/boltdb/bolt/issues/450
// 当前页时空的话,找下一个
if c.stack[len(c.stack)-1].count() == 0 {
c.next()
}
k, v, flags := c.keyValue()
// 是桶
if (flags & uint32(bucketLeafFlag)) != 0 {
return k, nil
}
return k, v
}
// first moves the cursor to the first leaf element under the last page in the stack.
// 找到最后一个非叶子节点的第一个叶子节点。index=0的节点
func (c *Cursor) first() {
for {
// Exit when we hit a leaf page.
var ref = &c.stack[len(c.stack)-1]
if ref.isLeaf() {
break
}
// Keep adding pages pointing to the first element to the stack.
var pgid pgid
if ref.node != nil {
pgid = ref.node.inodes[ref.index].pgid
} else {
pgid = ref.page.branchPageElement(uint16(ref.index)).pgid
}
p, n := c.bucket.pageNode(pgid)
c.stack = append(c.stack, elemRef{page: p, node: n, index: 0})
}
}

Next 分析

使用方式

1
2
3
4
5
6
c := b.Cursor()

// 启动遍历模式
for k, v := c.First(); k != nil; k, v = c.Next() {
fmt.Printf("cursor, key=%s, value=%s\n", string(k), string(v))
}

实现

1
2
3
4
5
6
7
8
9
10
11
12
13
14
15
16
17
18
19
20
21
22
23
24
25
26
27
28
29
30
31
32
33
34
35
36
37
38
// next 的实现就是去移动每一个 node 的 index, 从叶子结点开始,这样就能遍历完所有的叶子结点了!!!
// next moves to the next leaf element and returns the key and value.
// If the cursor is at the last leaf element then it stays there and returns nil.
func (c *Cursor) next() (key []byte, value []byte, flags uint32) {
for {
// Attempt to move over one element until we're successful.
// Move up the stack as we hit the end of each page in our stack.
var i int
// c.stack 是在调用 First 函数时被写入的,所以,这样倒序来遍历能实现按序获取
for i = len(c.stack) - 1; i >= 0; i-- {
elem := &c.stack[i]
if elem.index < elem.count()-1 {
elem.index++
break
}
}

// If we've hit the root page then stop and return. This will leave the
// cursor on the last element of the last page.
if i == -1 {
return nil, nil, 0
}

// Otherwise start from where we left off in the stack and find the
// first element of the first leaf page.
c.stack = c.stack[:i+1]
// 获取下一个叶子结点
c.first()

// If this is an empty page then restart and move back up the stack.
// https://github.com/boltdb/bolt/issues/450
if c.stack[len(c.stack)-1].count() == 0 {
continue
}

return c.keyValue()
}
}

node节点的相关操作

在开始分析node节点之前,我们先看一下官方对node节点的描述

node represents an in-memory, deserialized page

一个node节点,既可能是叶子节点,也可能是根节点,也可能是分支节点。是物理磁盘上读取进来的页page的内存表现形式。

1
2
3
4
5
6
7
8
9
10
11
12
13
14
15
16
17
18
19
20
21
22
23
24
25
// node represents an in-memory, deserialized page.
type node struct {
bucket *Bucket // 关联一个桶
isLeaf bool
unbalanced bool // 值为true的话,需要考虑页合并
spilled bool // 值为true的话,需要考虑页分裂
key []byte // 对于分支节点的话,保留的是最小的key
pgid pgid // 分支节点关联的页id
parent *node // 该节点的parent
children nodes // 该节点的孩子节点
inodes inodes // 该节点上保存的索引数据
}

/ inode represents an internal node inside of a node.
// It can be used to point to elements in a page or point
// to an element which hasn't been added to a page yet.
type inode struct {
// 表示是否是子桶叶子节点还是普通叶子节点。如果flags值为1表示子桶叶子节点,否则为普通叶子节点
flags uint32
// 当inode为分支元素时,pgid才有值,为叶子元素时,则没值
pgid pgid
key []byte
// 当inode为分支元素时,value为空,为叶子元素时,才有值
value []byte
}

node->page

page->node

node节点的增删改查

put(k,v)

1
2
3
4
5
6
7
8
9
10
11
12
13
14
15
16
17
18
19
20
21
22
23
24
25
26
27
// put inserts a key/value.
func (n *node) put(oldKey, newKey, value []byte, pgid pgid, flags uint32) {
if pgid >= n.bucket.tx.meta.pgid {
panic(fmt.Sprintf("pgid (%d) above high water mark (%d)", pgid, n.bucket.tx.meta.pgid))
} else if len(oldKey) <= 0 {
panic("put: zero-length old key")
} else if len(newKey) <= 0 {
panic("put: zero-length new key")
}

// Find insertion index.
index := sort.Search(len(n.inodes), func(i int) bool { return bytes.Compare(n.inodes[i].key, oldKey) != -1 })

// Add capacity and shift nodes if we don't have an exact match and need to insert.
exact := (len(n.inodes) > 0 && index < len(n.inodes) && bytes.Equal(n.inodes[index].key, oldKey))
if !exact {
n.inodes = append(n.inodes, inode{})
copy(n.inodes[index+1:], n.inodes[index:])
}

inode := &n.inodes[index]
inode.flags = flags
inode.key = newKey
inode.value = value
inode.pgid = pgid
_assert(len(inode.key) > 0, "put: zero-length inode key")
}

get(k)

在node中,没有get(k)的方法,其本质是在Cursor中就返回了get的数据。大家可以看看Cursor中的keyValue()方法。

del(k)

1
2
3
4
5
6
7
8
9
10
11
12
13
14
15
16
// del removes a key from the node.
func (n *node) del(key []byte) {
// Find index of key.
index := sort.Search(len(n.inodes), func(i int) bool { return bytes.Compare(n.inodes[i].key, key) != -1 })

// Exit if the key isn't found.
if index >= len(n.inodes) || !bytes.Equal(n.inodes[index].key, key) {
return
}

// Delete inode from the node.
n.inodes = append(n.inodes[:index], n.inodes[index+1:]...)

// Mark the node as needing rebalancing.
n.unbalanced = true
}

nextSibling()、prevSibling()

1
2
3
4
5
6
7
8
9
10
11
12
13
14
15
16
17
18
19
20
21
22
23
24
25
26
27
28
29
30
31
32
33
34
35
36
37
38
39
40
41
42
43
// childAt returns the child node at a given index.
func (n *node) childAt(index int) *node {
if n.isLeaf {
panic(fmt.Sprintf("invalid childAt(%d) on a leaf node", index))
}
return n.bucket.node(n.inodes[index].pgid, n)
}

// childIndex returns the index of a given child node.
func (n *node) childIndex(child *node) int {
index := sort.Search(len(n.inodes), func(i int) bool { return bytes.Compare(n.inodes[i].key, child.key) != -1 })
return index
}

// numChildren returns the number of children.
func (n *node) numChildren() int {
return len(n.inodes)
}

// nextSibling returns the next node with the same parent.
func (n *node) nextSibling() *node {
if n.parent == nil {
return nil
}
// 有父节点问题就不大了
index := n.parent.childIndex(n)
if index >= n.parent.numChildren()-1 {
return nil
}
return n.parent.childAt(index + 1)
}

// prevSibling returns the previous node with the same parent.
func (n *node) prevSibling() *node {
if n.parent == nil {
return nil
}
index := n.parent.childIndex(n)
if index == 0 {
return nil
}
return n.parent.childAt(index - 1)
}

Bucket的相关操作

创建一个Bucket

根据指定的key来创建一个Bucket,如果指定key的Bucket已经存在,则会报错。如果指定的key之前有插入过元素,也会报错。否则的话,会在当前的Bucket中找到合适的位置,然后新建一个Bucket插入进去,最后返回给客户端。

1
2
3
4
5
6
7
8
9
10
11
12
13
14
15
16
17
18
19
20
21
22
23
24
25
26
27
28
29
30
31
32
33
34
35
36
37
38
39
40
41
42
43
44
45
// CreateBucket creates a new bucket at the given key and returns the new bucket.
// Returns an error if the key already exists, if the bucket name is blank, or if the bucket name is too long.
// The bucket instance is only valid for the lifetime of the transaction.
func (b *Bucket) CreateBucket(key []byte) (*Bucket, error) {
if b.tx.db == nil {
return nil, ErrTxClosed
} else if !b.tx.writable {
return nil, ErrTxNotWritable
} else if len(key) == 0 {
return nil, ErrBucketNameRequired
}
// Move cursor to correct position.
// 拿到游标
c := b.Cursor()
// 开始遍历、找到合适的位置
k, _, flags := c.seek(key)
// Return an error if there is an existing key.
if bytes.Equal(key, k) {
// 是桶,已经存在了
if (flags & bucketLeafFlag) != 0 {
return nil, ErrBucketExists
}
// 不是桶、但key已经存在了
return nil, ErrIncompatibleValue
}
// Create empty, inline bucket.
var bucket = Bucket{
bucket: &bucket{},
rootNode: &node{isLeaf: true},
FillPercent: DefaultFillPercent,
}
// 拿到bucket对应的value
var value = bucket.write()
// Insert into node.
key = cloneBytes(key)
// 插入到inode中
// c.node()方法会在内存中建立这棵树,调用n.read(page)
c.node().put(key, key, value, 0, bucketLeafFlag)
// Since subbuckets are not allowed on inline buckets, we need to
// dereference the inline page, if it exists. This will cause the bucket
// to be treated as a regular, non-inline bucket for the rest of the tx.
b.page = nil
//根据key获取一个桶
return b.Bucket(key), nil
}

获取一个Bucket

1
2
3
4
5
6
7
8
9
10
11
12
13
14
15
16
17
18
19
20
21
22
23
24
25
26
27
28
29
30
31
32
33
34
35
36
37
38
39
40
41
42
43
44
45
46
47
48
49
50
51
/ Bucket retrieves a nested bucket by name.
// Returns nil if the bucket does not exist.
// The bucket instance is only valid for the lifetime of the transaction.
func (b *Bucket) Bucket(name []byte) *Bucket {
if b.buckets != nil {
if child := b.buckets[string(name)]; child != nil {
return child
}
}
// Move cursor to key.
// 根据游标找key
c := b.Cursor()
k, v, flags := c.seek(name)
// Return nil if the key doesn't exist or it is not a bucket.
if !bytes.Equal(name, k) || (flags&bucketLeafFlag) == 0 {
return nil
}
// Otherwise create a bucket and cache it.
// 根据找到的value来打开桶。
var child = b.openBucket(v)
// 加速缓存的作用
if b.buckets != nil {
b.buckets[string(name)] = child
}
return child
}
// Helper method that re-interprets a sub-bucket value
// from a parent into a Bucket
func (b *Bucket) openBucket(value []byte) *Bucket {
var child = newBucket(b.tx)
// If unaligned load/stores are broken on this arch and value is
// unaligned simply clone to an aligned byte array.
unaligned := brokenUnaligned && uintptr(unsafe.Pointer(&value[0]))&3 != 0
if unaligned {
value = cloneBytes(value)
}
// If this is a writable transaction then we need to copy the bucket entry.
// Read-only transactions can point directly at the mmap entry.
if b.tx.writable && !unaligned {
child.bucket = &bucket{}
*child.bucket = *(*bucket)(unsafe.Pointer(&value[0]))
} else {
child.bucket = (*bucket)(unsafe.Pointer(&value[0]))
}
// Save a reference to the inline page if the bucket is inline.
// 内联桶
if child.root == 0 {
child.page = (*page)(unsafe.Pointer(&value[bucketHeaderSize]))
}
return &child
}

key/value的插入、获取、删除

其实本质上,对key/value的所有操作最终都要表现在底层的node上。因为node节点就是用来存储真实数据的。

1
2
3
4
5
6
7
8
9
10
11
12
13
14
15
16
17
18
19
20
21
22
23
24
25
26
27
28
29
30
31
32
33
34
35
36
37
38
39
40
41
42
43
44
45
46
47
48
49
50
51
52
func (b *Bucket) Get(key []byte) []byte {
k, v, flags := b.Cursor().seek(key)

// Return nil if this is a bucket.
if (flags & bucketLeafFlag) != 0 {
return nil
}

// If our target node isn't the same key as what's passed in then return nil.
if !bytes.Equal(key, k) {
return nil
}
return v
}

func (b *Bucket) Put(key []byte, value []byte) error {
// Move cursor to correct position.
c := b.Cursor()
k, _, flags := c.seek(key)

// Return an error if there is an existing key with a bucket value.
if bytes.Equal(key, k) && (flags&bucketLeafFlag) != 0 {
return ErrIncompatibleValue
}

// Insert into node.
key = cloneBytes(key)
c.node().put(key, key, value, 0, 0)

return nil
}

func (b *Bucket) Delete(key []byte) error {
// Move cursor to correct position.
c := b.Cursor()
k, _, flags := c.seek(key)

// Return nil if the key doesn't exist.
if !bytes.Equal(key, k) {
return nil
}

// Return an error if there is already existing bucket value.
if (flags & bucketLeafFlag) != 0 {
return ErrIncompatibleValue
}

// Delete the node if we have a matching key.
c.node().del(key)

return nil
}

Bucket的页分裂、页合并

1
2
3
4
5
6
7
8
9
10
11
12
// spill writes all the nodes for this bucket to dirty pages.
func (b *Bucket) spill() error {}

func (b *Bucket) rebalance() {
for _, n := range b.nodes {
n.rebalance()
}
for _, child := range b.buckets {
child.rebalance()
}
}

[TOC]

概述

在boltdb中,一个db对应一个真实的磁盘文件。而在具体的文件中,boltdb又是按照以page为单位来读取和写入数据的,也就是说所有的数据在磁盘上都是按照页(page)来存储的,而此处的页大小是保持和操作系统对应的内存页大小一致,也就是4k。

每页由两部分数据组成:页头数据+真实数据,页头信息占16个字节,下面的页的结构定义

1
2
3
4
5
6
7
8
9
10
11
12
13
type pgid uint64
type page struct {
// 页id 8字节
id pgid
// flags:页类型,可以是分支,叶子节点,元信息,空闲列表 2字节,该值的取值详细参见下面描述
flags uint16
// 个数 2字节,统计叶子节点、非叶子节点、空闲列表页的个数
count uint16
// 4字节,数据是否有溢出,主要在空闲列表上有用
overflow uint32
// 真实的数据,实际上没有这个字段,
ptr uintptr
}

在boltdb中,它把页划分为四类:

page页类型 类型定义 类型值 用途
分支节点页 branchPageFlag 0x01 存储索引信息(页号、元素key值)
叶子节点页 leafPageFlag 0x02 存储数据信息(页号、插入的key值、插入的value值)
元数据页 metaPageFlag 0x04 存储数据库的元信息,例如空闲列表页id、放置桶的根页等
空闲列表页 freelistPageFlag 0x10 存储哪些页是空闲页,可以用来后续分配空间时,优先考虑分配

元数据页

每页有一个meta()方法,如果该页是元数据页的话,可以通过该方法来获取具体的元数据信息。

1
2
3
4
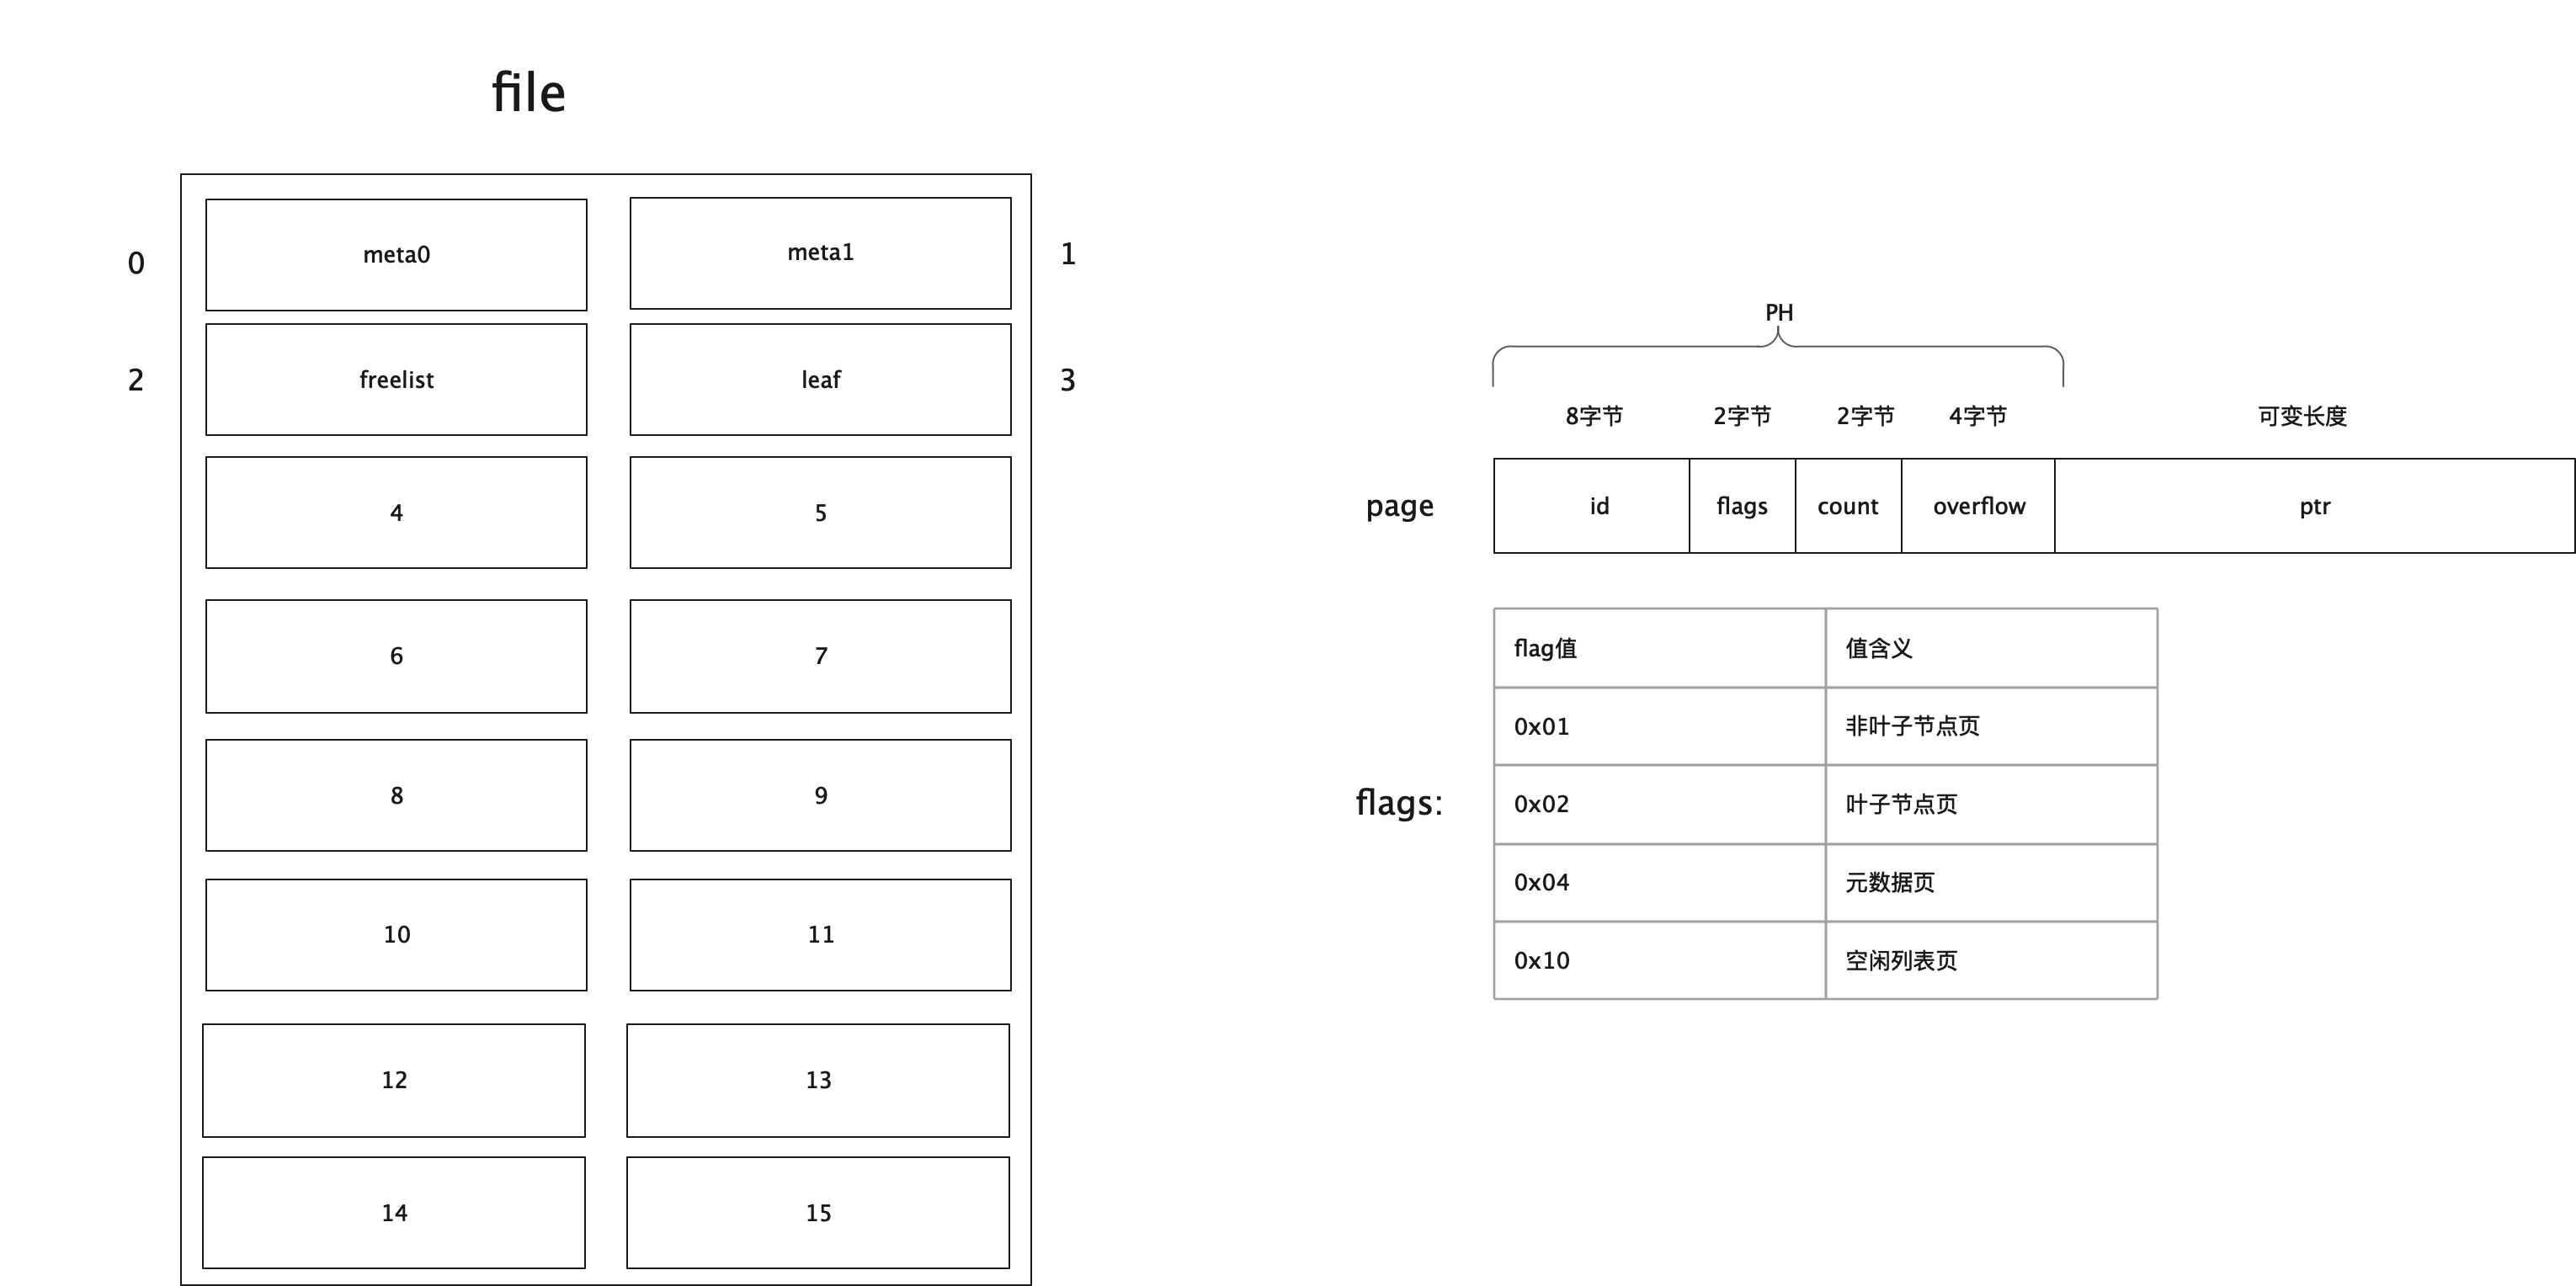
// meta returns a pointer to the metadata section of the page.
func (p *page) meta() *meta {
return (*meta)(unsafeAdd(unsafe.Pointer(p), unsafe.Sizeof(*p)))
}

详细的元数据信息定义如下:

1
2
3
4
5
6
7
8
9
10
11
type meta struct {
magic uint32 //魔数
version uint32 //版本
pageSize uint32 //page页的大小,该值和操作系统默认的页大小保持一致
flags uint32 //保留值,目前貌似还没用到
root bucket //所有小柜子bucket的根
freelist pgid //空闲列表页的id
pgid pgid //元数据页的id
txid txid //最大的事务id
checksum uint64 //用作校验的校验和
}

空闲列表页

空闲列表页中主要包含三个部分:所有已经可以重新利用的空闲页列表ids、将来很快被释放掉的事务关联的页列表pending、页id的缓存。详细定义在freelist.go文件中,下面给大家展示其空闲页的定义。

1
2
3
4
5
6
7
type freelist struct {
// 已经可以被分配的空闲页
ids []pgid // all free and available free page ids.
// 将来很快能被释放的空闲页,部分事务可能在读或者写
pending map[txid][]pgid // mapping of soon-to-be free page ids by tx.
cache map[pgid]bool // fast lookup of all free and pending page ids.
}

freelist->page

将空闲列表转换成页信息,写到磁盘中,此处需要注意一个问题.

1
2
3
4
// write writes the page ids onto a freelist page. All free and pending ids are
// saved to disk since in the event of a program crash, all pending ids will
// become free.
func (f *freelist) write(p *page) error {}

page->freelist

从磁盘中加载空闲页信息,并转为freelist结构,转换时

分支节点页

分支节点在存储时,一个分支节点页上会存储多个分支页元素即branchPageElement。这个信息可以记做为分支页元素元信息。元信息中定义了具体该元素的页id(pgid)、该元素所指向的页中存储的最小key的值大小、最小key的值存储的位置距离当前的元信息的偏移量pos。下面是branchPageElement的详细定义:

1
2
3
4
5
6
7
8
9
10
11
12
13
14
15
16
17
18
19
20
21
22
23
24
25
26
27
type branchPageElement struct {
pos uint32 //该元信息和真实key之间的偏移量
ksize uint32
pgid pgid
}

// key returns a byte slice of the node key.
func (n *branchPageElement) key() []byte {
return unsafeByteSlice(unsafe.Pointer(n), 0, int(n.pos), int(n.pos)+int(n.ksize))
}

// branchPageElement retrieves the branch node by index
func (p *page) branchPageElement(index uint16) *branchPageElement {
return (*branchPageElement)(unsafeIndex(unsafe.Pointer(p), unsafe.Sizeof(*p),
unsafe.Sizeof(branchPageElement{}), int(index)))
}

// branchPageElements retrieves a list of branch nodes.
func (p *page) branchPageElements() []branchPageElement {
if p.count == 0 {
return nil
}
var elems []branchPageElement
data := unsafeAdd(unsafe.Pointer(p), unsafe.Sizeof(*p))
unsafeSlice(unsafe.Pointer(&elems), data, int(p.count))
return elems
}

内存结构

下图展现的是非叶子节点存储方式。

node

在内存中,分支节点页和叶子节点页都是通过node来表示,只不过的区别是通过其node中的isLeaf这个字段来区分。下面和大家分析分支节点页page和内存中的node的转换关系。

在内存中,具体的一个分支节点或者叶子节点都被抽象为一个node对象,其中是分支节点还是叶子节点主要通通过其isLeaf字段来区分。下面对分支节点和叶子节点做两点说明:

  1. 对叶子节点而言,其没有children这个信息。同时也没有key信息。isLeaf字段为true,其上存储的key、value都保存在inodes中
  2. 对于分支节点而言,其具有key信息,同时children也不一定为空。isLeaf字段为false,同时该节点上的数据保存在inode中。

page -> node

通过分支节点页来构建node节点

1
2
3
4
5
6
7
8
9
10
11
12
13
14
15
16
17
18
19
20
21
22
23
24
25
26
27
28
29
30
31
// 根据page来初始化node
// read initializes the node from a page.
func (n *node) read(p *page) {
n.pgid = p.id
n.isLeaf = ((p.flags & leafPageFlag) != 0)
n.inodes = make(inodes, int(p.count))
for i := 0; i < int(p.count); i++ {
inode := &n.inodes[i]
if n.isLeaf {
// 获取第i个叶子节点
elem := p.leafPageElement(uint16(i))
inode.flags = elem.flags
inode.key = elem.key()
inode.value = elem.value()
} else {
// 树枝节点
elem := p.branchPageElement(uint16(i))
inode.pgid = elem.pgid
inode.key = elem.key()
}
_assert(len(inode.key) > 0, "read: zero-length inode key")
}
// Save first key so we can find the node in the parent when we spill.
if len(n.inodes) > 0 {
// 保存第1个元素的值
n.key = n.inodes[0].key
_assert(len(n.key) > 0, "read: zero-length node key")
} else {
n.key = nil
}
}

node->page

将node中的数据写入到page中

1
2
3
4
5
6
7
8
9
10
11
12
13
14
15
16
17
18
19
20
21
22
23
24
25
26
27
28
29
30
31
32
33
34
35
36
37
38
39
40
41
42
43
44
45
46
47
48
49
50
51
52
53
54
55
// write writes the items onto one or more pages.
func (n *node) write(p *page) {
// Initialize page.
if n.isLeaf {
p.flags |= leafPageFlag
} else {
p.flags |= branchPageFlag
}

if len(n.inodes) >= 0xFFFF {
panic(fmt.Sprintf("inode overflow: %d (pgid=%d)", len(n.inodes), p.id))
}
p.count = uint16(len(n.inodes))

// Stop here if there are no items to write.
if p.count == 0 {
return
}

// Loop over each item and write it to the page.
// off tracks the offset into p of the start of the next data.
// off: page 和 page elements 的头信息
off := unsafe.Sizeof(*p) + n.pageElementSize()*uintptr(len(n.inodes))
for i, item := range n.inodes {
_assert(len(item.key) > 0, "write: zero-length inode key")

// Create a slice to write into of needed size and advance
// byte pointer for next iteration.
sz := len(item.key) + len(item.value)
b := unsafeByteSlice(unsafe.Pointer(p), off, 0, sz)
off += uintptr(sz)

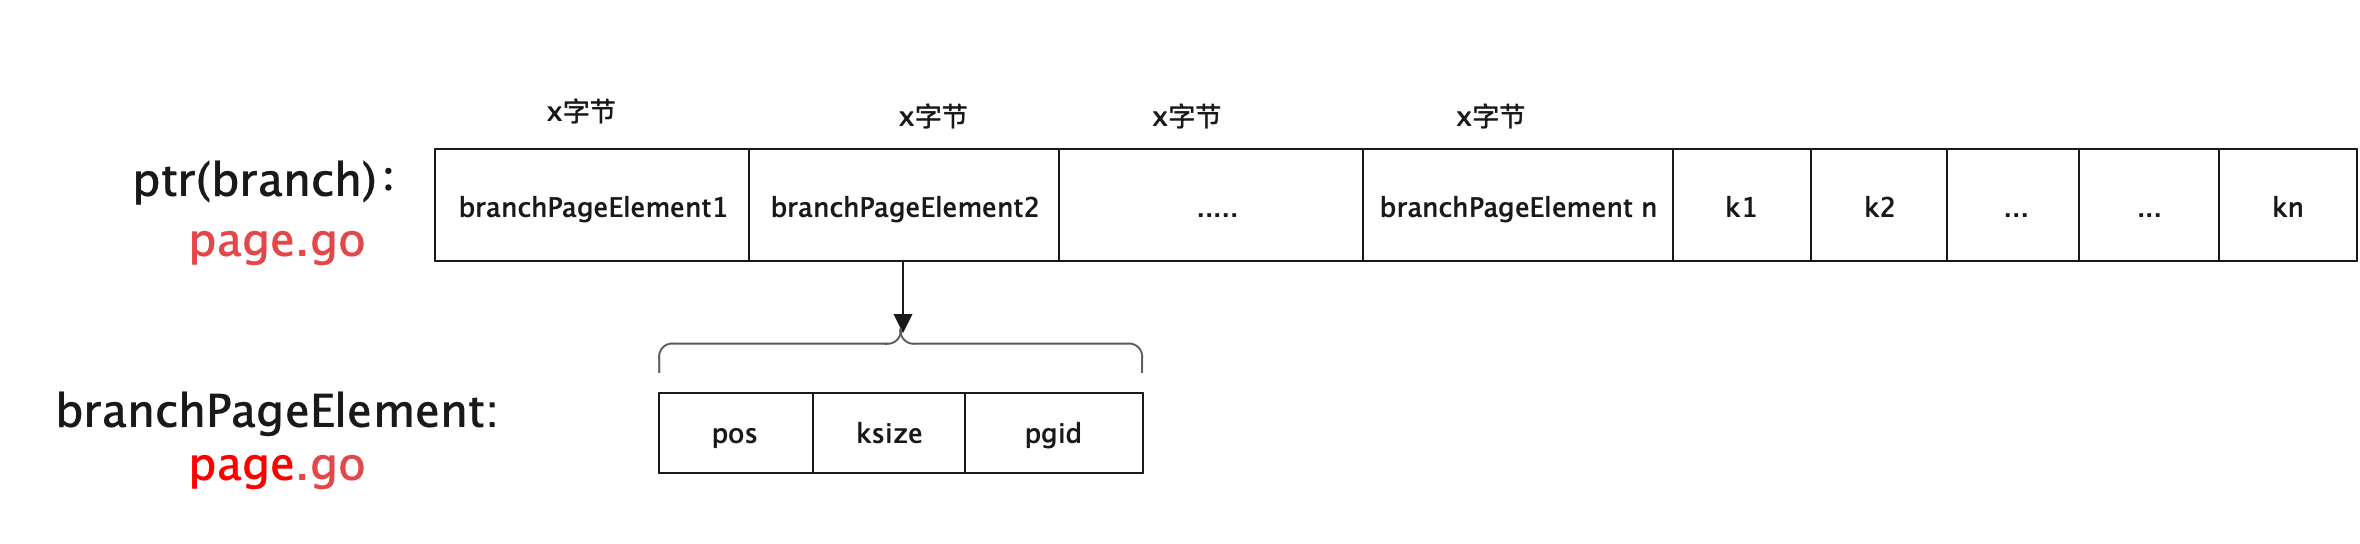
// Write the page element.
// 1. 写一个节点的头信息
if n.isLeaf {
elem := p.leafPageElement(uint16(i))
elem.pos = uint32(uintptr(unsafe.Pointer(&b[0])) - uintptr(unsafe.Pointer(elem)))
elem.flags = item.flags
elem.ksize = uint32(len(item.key))
elem.vsize = uint32(len(item.value))
} else {
elem := p.branchPageElement(uint16(i))
elem.pos = uint32(uintptr(unsafe.Pointer(&b[0])) - uintptr(unsafe.Pointer(elem)))
elem.ksize = uint32(len(item.key))
elem.pgid = item.pgid
_assert(elem.pgid != p.id, "write: circular dependency occurred")
}
// 2. 写数据信息
// Write data for the element to the end of the page.
l := copy(b, item.key)
copy(b[l:], item.value)
}

// DEBUG ONLY: n.dump()
}

叶子节点页

叶子节点主要用来存储实际的数据,也就是key+value了。下面看看具体的key+value是如何设计的。

在boltdb中,每一对key/value在存储时,都有一份元素元信息,也就是leafPageElement。其中定义了key的长度、value的长度、具体存储的值距离元信息的偏移位置pos。

1
2
3
4
5
6
7
8
9
10
11
12
13
14
15
16
17
18
19
20
21
22
23
24
25
26
27
28
29
30
31
32
33
34
35
36
37
38
39
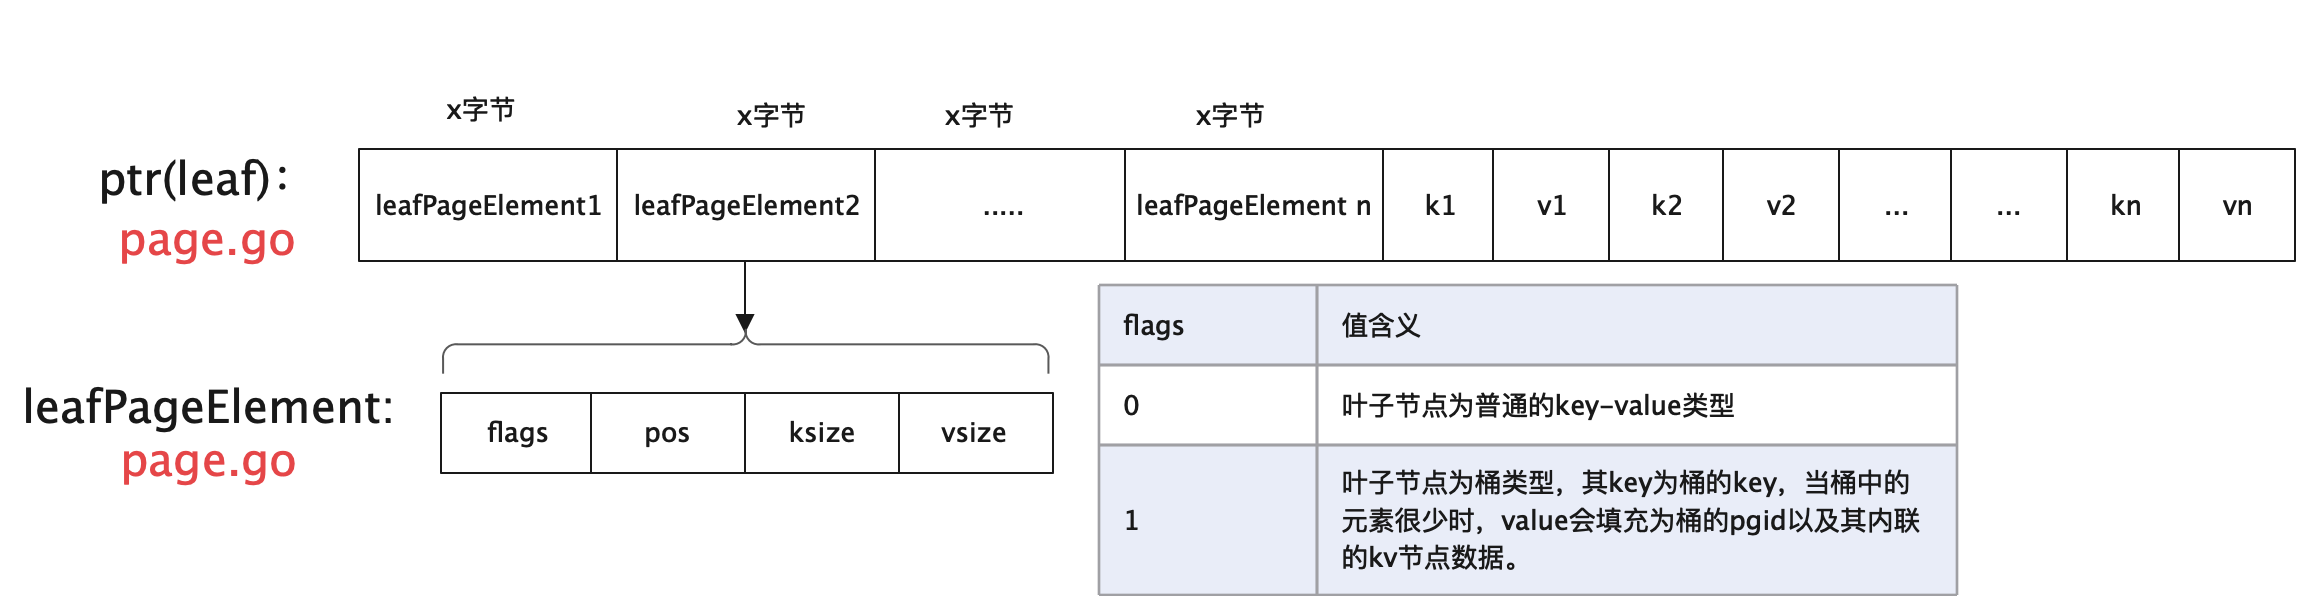
// leafPageElement represents a node on a leaf page.
// 叶子节点既存储key,也存储value
type leafPageElement struct {
flags uint32 //该值主要用来区分,是子桶叶子节点元素还是普通的key/value叶子节点元素。flags值为1时表示子桶。否则为key/value
pos uint32
ksize uint32
vsize uint32
}

// key returns a byte slice of the node key.
func (n *leafPageElement) key() []byte {
i := int(n.pos)
j := i + int(n.ksize)
return unsafeByteSlice(unsafe.Pointer(n), 0, i, j)
}

// value returns a byte slice of the node value.
func (n *leafPageElement) value() []byte {
i := int(n.pos) + int(n.ksize)
j := i + int(n.vsize)
return unsafeByteSlice(unsafe.Pointer(n), 0, i, j)
}

// leafPageElement retrieves the leaf node by index
func (p *page) leafPageElement(index uint16) *leafPageElement {
return (*leafPageElement)(unsafeIndex(unsafe.Pointer(p), unsafe.Sizeof(*p),
leafPageElementSize, int(index)))
}

// leafPageElements retrieves a list of leaf nodes.
func (p *page) leafPageElements() []leafPageElement {
if p.count == 0 {
return nil
}
var elems []leafPageElement
data := unsafeAdd(unsafe.Pointer(p), unsafe.Sizeof(*p))
unsafeSlice(unsafe.Pointer(&elems), data, int(p.count))
return elems
}

内存结构

下图展现的是叶子节点存储方式。

总结

本章中我们重点分析了boltdb中的核心数据结构(page、freelist、meta、node)以及他们之间的相互转化。

在底层磁盘上存储时,boltdb是按照页的单位来存储实际数据的,页的大小取自于它运行的操作系统的页大小。在boltdb中,根据存储的数据的类型不同,将页page整体上分为4大类:

1. 元信息页(meta page)

2. 空闲列表页(freelist page)

3. 分支节点页(branch page)

4. 叶子节点页(leaf page)

在page的头信息中通过flags字段来区分。

在内存中同样有对应的结构来映射磁盘上的上述几种页。如元信息meta空闲列表freelist、**分支/叶子节点node(通过isLeaf区分分支节点还是叶子节点)**。我们在每一节中先详细介绍其数据结构的定义。接着再重点分析在内存和磁盘上该类型的页时如何进行转换的。可以准确的说,数据结构属于boltdb核心中的核心。梳理清楚了每个数据结构存储的具体数据和格式后。下一章我们将重点分析其另外两个核心结构bucket和node。

原文

第二章 boltdb的核心数据结构分析

[TOC]

boltdb事务Tx定义

1
2
3
4
5
6
7
8
9
10
11
12
13
14
15
16
17
18
19
20
21
22
23
24
25
26
27
28
29
30
31
32
33
34
35
36
37
38
39
40
41
42
43
44
// Tx 主要封装了读事务和写事务。其中通过writable来区分是读事务还是写事务
type Tx struct {
writable bool
managed bool
db *DB
meta *meta
root Bucket
pages map[pgid]*page
stats TxStats
// 提交时执行的动作
commitHandlers []func()

// WriteFlag specifies the flag for write-related methods like WriteTo().
// Tx opens the database file with the specified flag to copy the data.
//
// By default, the flag is unset, which works well for mostly in-memory
// workloads. For databases that are much larger than available RAM,
// set the flag to syscall.O_DIRECT to avoid trashing the page cache.
WriteFlag int
}

// init initializes the transaction.
func (tx *Tx) init(db *DB) {
tx.db = db
tx.pages = nil

// Copy the meta page since it can be changed by the writer.
// 拷贝元信息
tx.meta = &meta{}
db.meta().copy(tx.meta)

// Copy over the root bucket.
// 拷贝根节点
tx.root = newBucket(tx)
tx.root.bucket = &bucket{}
// meta.root=bucket{root:3}
*tx.root.bucket = tx.meta.root

// Increment the transaction id and add a page cache for writable transactions.
if tx.writable {
tx.pages = make(map[pgid]*page)
tx.meta.txid += txid(1)
}
}

Begin()实现

1
2
3
4
5
6
7
// return tx
func (db *DB) Begin(writable bool) (*Tx, error) {
if writable {
return db.beginRWTx()
}
return db.beginTx()
}

Commit()实现

Commit()方法内部实现中,总体思路是:

  1. 先判定节点要不要合并、分裂
  2. 对空闲列表的判断,是否存在溢出的情况,溢出的话,需要重新分配空间
  3. 将事务中涉及改动的页进行排序(保证尽可能的顺序IO),排序后循环写入到磁盘中,最后再执行刷盘
  4. 当数据写入成功后,再将元信息页写到磁盘中,刷盘以保证持久化
  5. 上述操作中,但凡有失败,当前事务都会进行回滚
1
2
3
4
5
6
7
8
9
10
11
12
13
14
15
16
17
18
19
20
21
// 先更新数据然后再更新元信息
// 更新数据成功、元信息未来得及更新机器就挂掉了。数据如何恢复?
func (tx *Tx) Commit() error {
// Write dirty pages to disk.
startTime = time.Now()
if err := tx.write(); err != nil {
tx.rollback()
return err
}
// Write meta to disk.
// 元信息写入到磁盘
if err := tx.writeMeta(); err != nil {
tx.rollback()
return err
}
}

// write writes any dirty pages to disk.
func (tx *Tx) write() error {

}

Rollback()实现

Rollback()中,主要对不同事务进行不同操作:

  1. 如果当前事务是只读事务,则只需要从db中的txs中找到当前事务,然后移除掉即可。
  2. 如果当前事务是读写事务,则需要将空闲列表中和该事务关联的页释放掉,同时重新从freelist中加载空闲页。
1
2
3
4
5
6
7
8
9
10
11
12
13
14
15
16
17
18
19
20
func (tx *Tx) Rollback() error {
_assert(!tx.managed, "managed tx rollback not allowed")
if tx.db == nil {
return ErrTxClosed
}
tx.rollback()
return nil
}
func (tx *Tx) rollback() {
if tx.db == nil {
return
}
if tx.writable {
// 移除该事务关联的pages
tx.db.freelist.rollback(tx.meta.txid)
// 重新从freelist页中读取构建空闲列表
tx.db.freelist.reload(tx.db.page(tx.db.meta().freelist))
}
tx.close()
}

WriteTo()和CopyFile()实现

1
2
3
4
5
6
7
8
9
10
11
12
13
14
15
16
17
// WriteTo writes the entire database to a writer.
// If err == nil then exactly tx.Size() bytes will be written into the writer.
// 将当前 database 写入到 w
func (tx *Tx) WriteTo(w io.Writer) (n int64, err error) {}

func (tx *Tx) CopyFile(path string, mode os.FileMode) error {
f, err := os.OpenFile(path, os.O_RDWR|os.O_CREATE|os.O_TRUNC, mode)
if err != nil {
return err
}
err = tx.Copy(f)
if err != nil {
_ = f.Close()
return err
}
return f.Close()
}

总结

本章主要详细分析了下,boltdb内部事务的实现机制,再此基础上对事务中核心的几个方法做了代码的分析。到此基本上一个数据库核心的部件都已经实现完毕。那剩下的功能就把各部分功能进行组装起来,实现一个完整对外可用的数据库了。下一章我们来详细分析下boltdb中DB对象的内部一些实现。

[TOC]

1
2
3
4
5
6
7
8
9
10
11
12
13
14
15
16
17
18
19
20
21
22
23
24
25
26
27
28
29
30
31
32
33
34
35
36
37
// 地址加法运算,偏移运算
func unsafeAdd(base unsafe.Pointer, offset uintptr) unsafe.Pointer {
return unsafe.Pointer(uintptr(base) + offset)
}

// 地址加法运算, 多元素偏移
func unsafeIndex(base unsafe.Pointer, offset uintptr, elemsz uintptr, n int) unsafe.Pointer {
return unsafe.Pointer(uintptr(base) + offset + uintptr(n)*elemsz)
}

// 从一个地址开始将, 转为字节流
func unsafeByteSlice(base unsafe.Pointer, offset uintptr, i, j int) []byte {
// See: https://github.com/golang/go/wiki/cgo#turning-c-arrays-into-go-slices
//
// This memory is not allocated from C, but it is unmanaged by Go's
// garbage collector and should behave similarly, and the compiler
// should produce similar code. Note that this conversion allows a
// subslice to begin after the base address, with an optional offset,
// while the URL above does not cover this case and only slices from
// index 0. However, the wiki never says that the address must be to
// the beginning of a C allocation (or even that malloc was used at
// all), so this is believed to be correct.
return (*[maxAllocSize]byte)(unsafeAdd(base, offset))[i:j:j]
}

// 修改 slice 的值域
// unsafeSlice modifies the data, len, and cap of a slice variable pointed to by
// the slice parameter. This helper should be used over other direct
// manipulation of reflect.SliceHeader to prevent misuse, namely, converting
// from reflect.SliceHeader to a Go slice type.
func unsafeSlice(slice, data unsafe.Pointer, len int) {
s := (*reflect.SliceHeader)(slice)
s.Data = uintptr(data)
s.Cap = len
s.Len = len
}